I wanted to create a project that showed that I can do full stack web development. I wanted to do something that was small enough to get done relatively quickly but complex enough to show that I did it myself and didn’t just follow a tutorial. I want it to be something that I can show potential employers as an example of the full stack web development that I am capable of. gcsite.crookedfingerguy.com is what I came up with.
I used C# ASP.Net Core 5.0 with Razor pages for the web development. For the database I used SQL initially for testing and then I switched to MariaDB on RDS on the Amazon cloud. I hosted the web application on AWS ECS Beanstalk. I deployed the software by using the amazon extension for Visual Studio 2019. I setup GitHub for version control. I used SendGrid to handle the account registration and password reset emails.
There was a lot of learning new technologies for me on this project. I really didn’t encounter any new programming concepts on this project. I was mostly going over the way ASP.Net (Model View Control) MVC system works. Learning how data moves between pages and the server was in this context was new to me. Getting code first Entity Framework was something that I had never used before this project. I had always just made the tables on the database and used SQL Queries from the application before. Having the Entity Framework handle whole migration process was probably the most confusing aspect of the project for me. Because I had to learn a lot of syntax to get it to create a database that made sense for the project.
I learned to use the IGDB API to search for games to add to collections. Keeping the API key and database connection string secret on multiple systems with version control caused some problems for me but I sorted that out eventually. Otherwise, the IGDB API, which is owned by Twitch.tv, was not too difficult to get working with my web site.
I used the software I wrote about in my blog before to create the 3D models of the game boxes that I uploaded and displayed on the web site. It shows the game boxes in animated 3D on my phone browser even.
This is just a minimum viable program meant to be a proof-of-concept web application. The concept I am proving is that I can create and deploy a full stack web application by myself.
The main problem with the web site currently is that the caching from the IGDB API is stored on the beanstalk instance. That means the cache can get out of sync with the database if I republish the application for an update. It can also get out of sync if an additional instance is spun up due to web site being overloaded. To fix that I need to store the IGDB API cache and the uploaded 3D models on an AWS S3 bucket. Figuring out how to do that is on the list of things to learn how to do. Of course there is a large list of possible improvements that I could make to the site. I’m not sure if I will have time to get to any of those things anytime soon. I want to work on learning more JavaScript to make it more likely I will get a software development job.
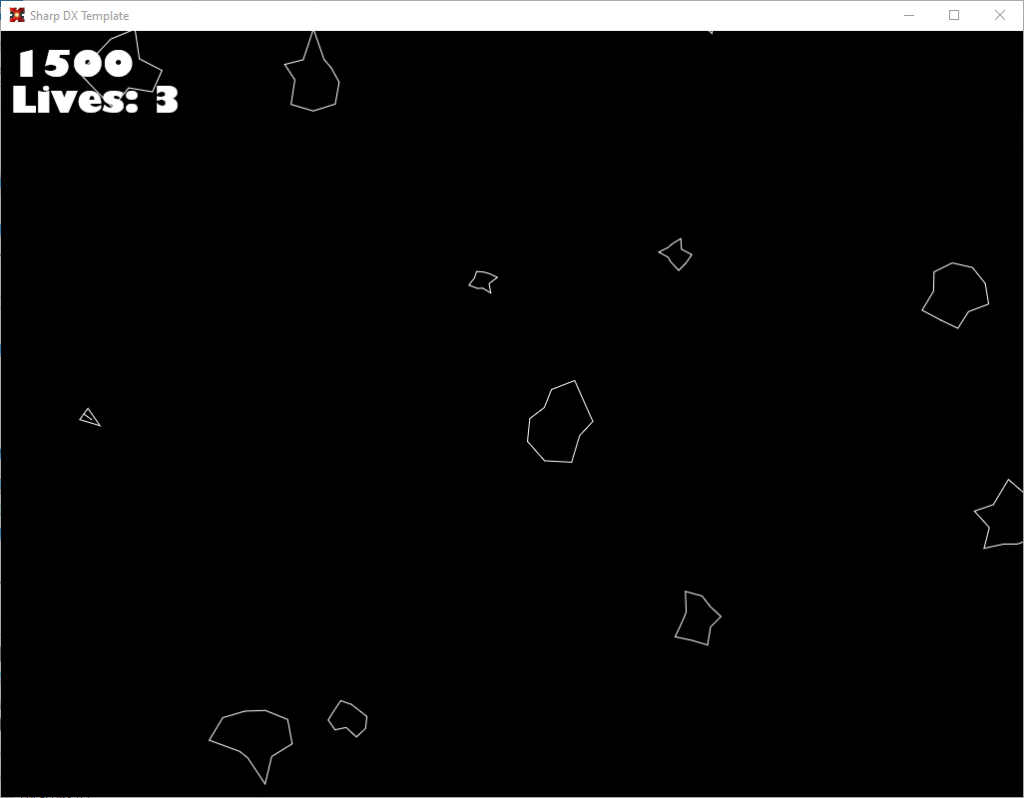
In two streams I managed to make a simple clone of Asteroids. As has been my trend lately I used the DirectX wrapper for C# called SharpDX to handle the graphics.
One thing I did off stream to help me understand the whole rotating polygons situation was I made a toy program. That program helped me learn to draw functions and rotate vectors using SharpDX. I also related the unit circle and the the sine and cosine functions.
The interesting bit of cod e for this project was as follows:
            //unit vector on unit circle
            solidColorBrush.Color= new RawColor4(0.7529412f, 0.7529412f, 0.7529412f, 1.0f);
            d2dRenderTarget.DrawLine(new Vector2(tx,ty),new Vector2(direction.X*magnitude+tx,direction.Y*magnitude+ty),solidColorBrush);
            d2dRenderTarget.DrawEllipse(new Ellipse(new RawVector2(tx,ty),magnitude,magnitude), solidColorBrush);

            //sine component of unit vector
            solidColorBrush.Color = new RawColor4(0.5019608f, 0.5019608f, 1f, 1.0f);
            d2dRenderTarget.DrawLine(new Vector2(tx + direction.X * magnitude, ty),
                                     new Vector2(direction.X * magnitude + tx, direction.Y * magnitude + ty), solidColorBrush);

            //cosine component of unit vector
            solidColorBrush.Color= new RawColor4(0.1960784f, 0.8039216f, 0.2431373f, 1.0f);
            d2dRenderTarget.DrawLine(new Vector2(tx + direction.X * magnitude, ty), new Vector2(tx, ty), solidColorBrush);

            //red dot on unit circle
            solidColorBrush.Color= new RawColor4(1f, 0f, 0f, 1.0f);
            d2dRenderTarget.FillEllipse(new Ellipse(new RawVector2(direction.X * magnitude + tx,
                                         direction.Y * magnitude + ty), 3f, 3f), solidColorBrush);

            //sin graph
            sinXOffset = 50f;
            sinYOffset = 375;
            sinGraphWidth = magnitude*4;
            sinGraphHeight = sinGraphWidth / 2;
            solidColorBrush.Color = new RawColor4(0.7529412f, 0.7529412f, 0.7529412f, 1.0f);
            d2dRenderTarget.DrawLine(new Vector2(sinXOffset, sinYOffset),
                                      new Vector2(sinXOffset + sinGraphWidth, sinYOffset), solidColorBrush);
            d2dRenderTarget.DrawLine(new Vector2(sinXOffset + sinGraphWidth / 2, sinYOffset - sinGraphHeight / 2),
                                        new Vector2(sinXOffset + sinGraphWidth / 2, sinYOffset + sinGraphHeight / 2), solidColorBrush);

            PathGeometry shape = new PathGeometry(d2dFactory);
            GeometrySink sink = shape.Open();
            float y = (float)(sinGraphWidth / 4 * Math.Sin((float)-Math.PI));
            int x = 0;
            Vector2 vect = new Vector2(x + sinXOffset, y + sinYOffset);
            sink.BeginFigure(vect, FigureBegin.Hollow);

            for (x = 0; x < sinGraphWidth; x++)
            {
                vect.X = (float)(x + sinXOffset);
                vect.Y = (float)Math.Sin(Map((float)x, (float)0, (float)sinGraphWidth,
                         (float)-Math.PI, (float)Math.PI)) * sinGraphHeight / 2 + sinYOffset;
                sink.AddLine(vect);
            }
            sink.EndFigure(FigureEnd.Open);
            sink.Close();
            d2dRenderTarget.DrawGeometry(shape, solidColorBrush, 1f);

            //sine component of unit vector
            float sMapX = Map(rotation,-(float)(Math.PI),(float)(Math.PI),0, sinGraphWidth);
            float sMapY=Map(direction.Y,-1,1,-sinGraphHeight / 2, sinGraphHeight / 2);
            solidColorBrush.Color = new RawColor4(0.5019608f, 0.5019608f, 1f, 1.0f);
            d2dRenderTarget.DrawLine(new Vector2(sMapX+ sinXOffset, sinYOffset),
                                        new Vector2(sMapX+ sinXOffset, sMapY + sinYOffset), solidColorBrush);


            //cosine graph
            cosXOffset = 50f;
            cosYOffset = 600;
            cosGraphWidth = magnitude*4;
            cosGraphHeight = cosGraphWidth/2;
            solidColorBrush.Color = new RawColor4(0.7529412f, 0.7529412f, 0.7529412f, 1.0f);
            d2dRenderTarget.DrawLine(new Vector2(cosXOffset,cosYOffset),
                                     new Vector2(cosXOffset+ cosGraphWidth, cosYOffset), solidColorBrush);
            d2dRenderTarget.DrawLine(new Vector2(cosXOffset+ cosGraphWidth/2, cosYOffset- cosGraphHeight/2),
                                        new Vector2(cosXOffset + cosGraphWidth/2, cosYOffset+ cosGraphHeight/2), solidColorBrush);

            shape = new PathGeometry(d2dFactory);
            sink = shape.Open();
            y = (float)(cosGraphWidth / 4 * Math.Cos((float)-Math.PI));
            x = 0;
            vect = new Vector2(x+cosXOffset,y+cosYOffset);
            sink.BeginFigure(vect, FigureBegin.Hollow);

            for(x=0;x<cosGraphWidth;x++)
            {
                vect.X = (float)(x+cosXOffset);
                vect.Y = (float)Math.Cos(Map((float)x, (float)0, (float)cosGraphWidth,
                         (float)-Math.PI, (float)Math.PI))*cosGraphHeight/2+cosYOffset;
                sink.AddLine(vect);
            }
            sink.EndFigure(FigureEnd.Open);
            sink.Close();
            d2dRenderTarget.DrawGeometry(shape, solidColorBrush, 1f);

            //cosine component of unit vector
            float cMapX = Map(rotation, -(float)(Math.PI), (float)(Math.PI), 0, sinGraphWidth);
            float cMapY = Map(direction.X, -1, 1, -sinGraphHeight / 2, sinGraphHeight / 2);
            solidColorBrush.Color = new RawColor4(0.1960784f, 0.8039216f, 0.2431373f, 1.0f);
            d2dRenderTarget.DrawLine(new Vector2(cMapX + cosXOffset, cosYOffset),
                                        new Vector2(cMapX + cosXOffset, cMapY + cosYOffset), solidColorBrush);


            solidColorBrush.Color = Color.White;
            d2dRenderTarget.DrawText("Radians: "+rotation.ToString("0.00")+" Degrees: "+(rotation*180/Math.PI).ToString("0."),
                                TestTextFormat, TestTextArea, solidColorBrush);

            solidColorBrush.Color = new RawColor4(0.7529412f, 0.7529412f, 0.7529412f, 1.0f);
            asteroid.DrawAsteroid(d2dRenderTarget, d2dFactory, solidColorBrush);
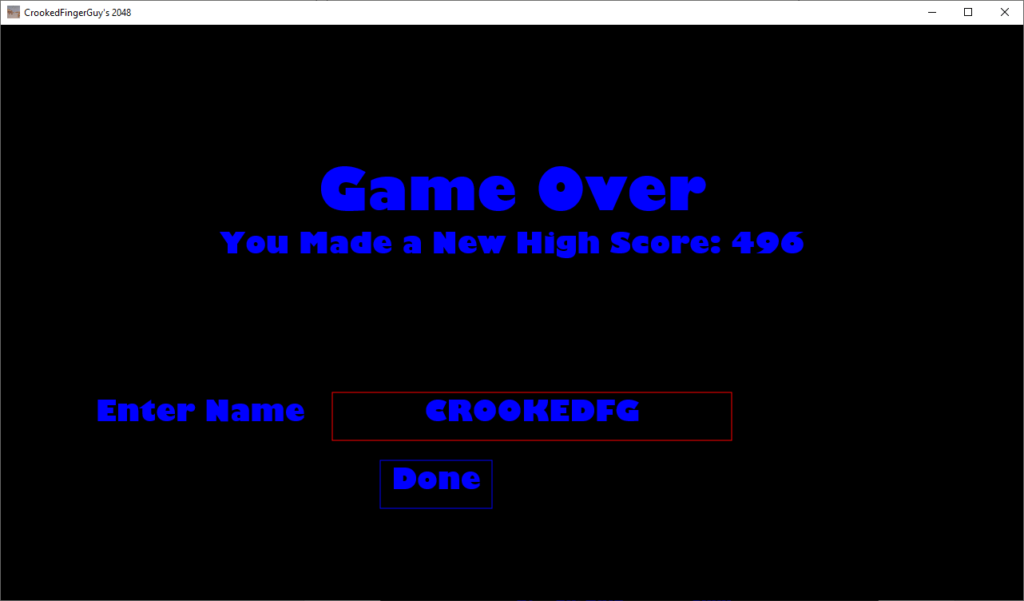
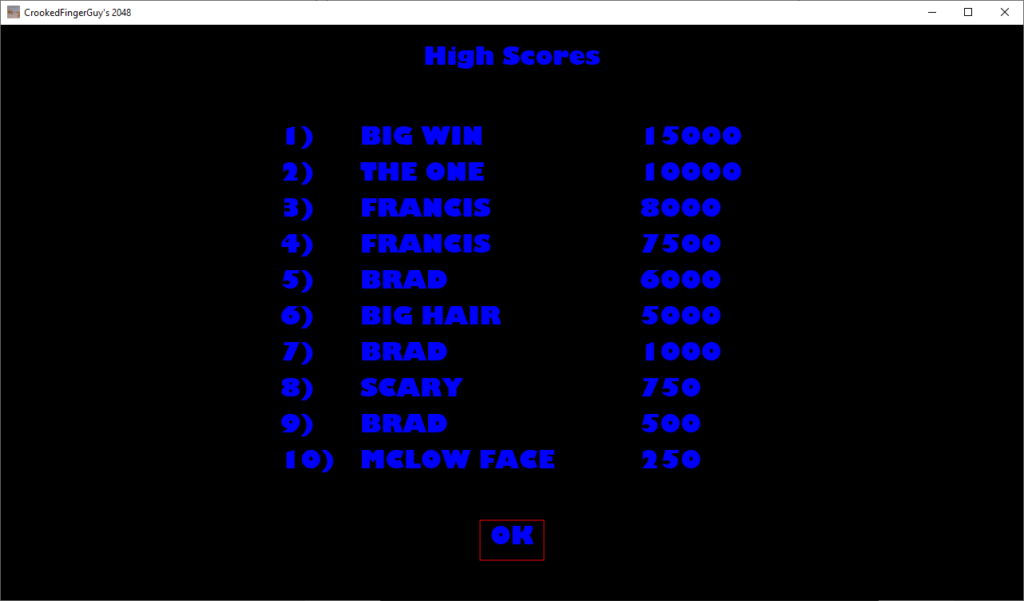
A year ago, I made 2048 in the console. I did it in less than 500 lines of code and I had made it with the game board drawing separate from the rest of the game with the intention of swapping out the display to a graphical one. A year later and that paid off because it was fairly simple to just drop in the game logic to my SharpDX template.
I did unfortunately separate out the generating of new pieces into its own class. This caused the code flow in an awkward way when the game resets, but it works. The code I wrote is about 2500 lines. Most of that is in the menu system that I started in my Matrix Falling Code project. I extended the functionality of the system to include text input and toggle controls.
I also created a way for menus to hand off to other menus. It was good practice in polymorphism. This was required to have sub menus and do things like get the played to enter their name to be saved in the high scores list. The project was a good example in the difference between a project that just does the bare minimum and one that is fully featured. I streamed about 16 hours of me working this on twitch and I probably spent another 4 off stream working on the project. I’m pleased with the result for 20 hours of effort.
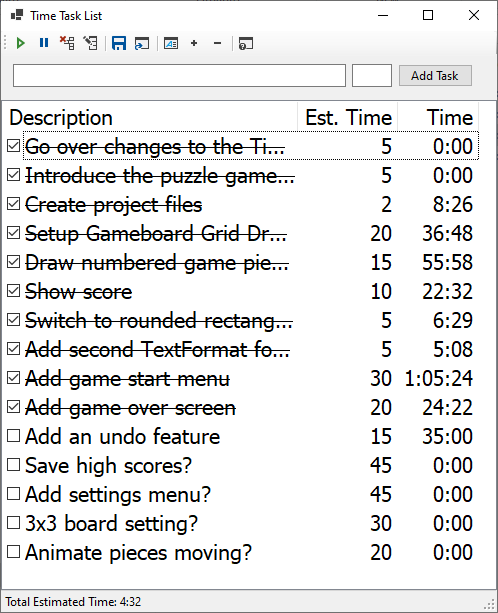
Sometimes having a list of things isn’t enough planning. You need to assign a time to each task on your list too. Hey, why not have a program that can keep track of how much time you actually spent on those tasks so you can get an idea of how good your time estimates are. Well that’s what Timed Task List is for.
The program has many of the features you would expect. Save, load, add tasks, edit tasks, change the text size and font. There is a right-click context menu that allows you to delete tasks and reset the accrued time for the task.
I made the program in NET Core 3.1. The code is available on my GitHub.
I streamed a lot of the creation of this program on twitch.tv/crookedfingerguy. I made it to aid in streaming what my streams objectives for the day are and to track how well I stuck to the plan. This was also good programming practice. I haven’t made a windows forms desktop application for a while. I am pleased with the effort.
Trying to start programming regularly again so I started out simple by streaming the creation of a motion graphic using C# on twitch.tv. I have a few clone games in the works just copies of the old standbys like Tetris and Breakout. I created a template using the SharpDX wrapper for the DirectX API. It doesn’t do anything fancy like error checking or anything. The program crashes if you don’t have a DirectX compatible controller plugged in for example. What it does do is provide a simple non-flickering canvas in Windows. That’s it no game engine really at all.
Look I used a folder to organize my cs files!
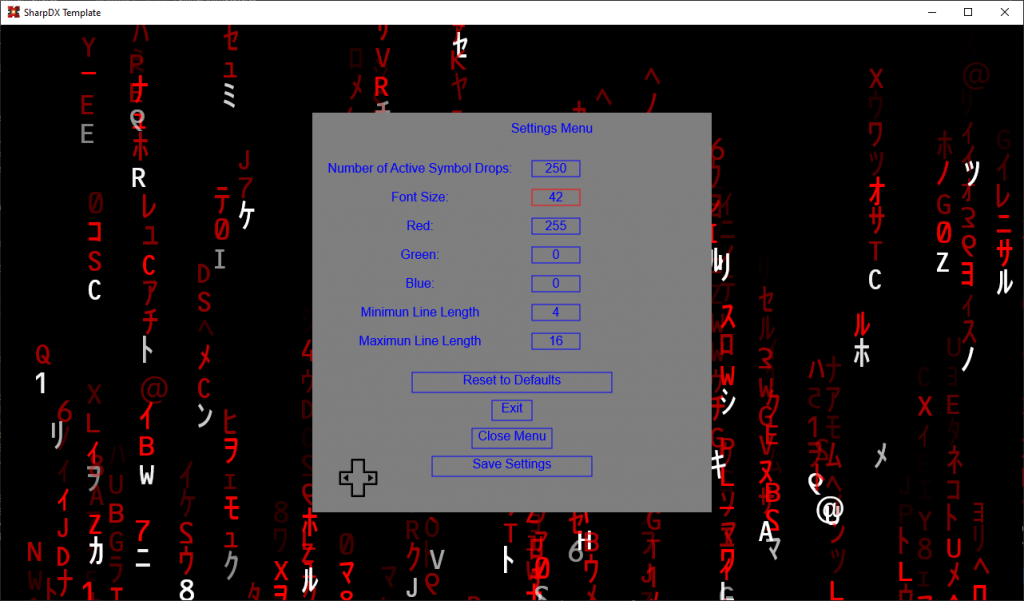
I used this Matrix Falling Rain program to create a 2D motion graphic. I also over the course of about 10 hours streaming created a simple menu system for changing programs settings with a controller. I created the menu system that I hope to use in those simple game clones for things like the start menu and basic game settings. In this motion graphic program I used it to dynamically change the appearance of the motion graphic. You can change the number of falling symbol lines and their size. You can change the color, speed, and number of symbols in each falling line of symbols. I even added the ability to save settings or reset the settings to default.
I uploaded the code to my Github. You may have to fiddle with the NuGet packet manager to get all the references straightened out to compile it.
This is mostly some base programming to get used to streaming. Hopefully I will be getting a few more simple game clone programs finished and ready for people to take a look at soon.
I have finished a usable tool for the very narrow purpose of documenting PC gaming boxes. Only two box types are currently supported. The small PC game box and the small PC game box with flap.
I have posted a video on Youtube.com to show how it works. You will also need Blender 2.80 to view the file is creates.
This is a programming sub project really. I am working on creating a web site with a SQL database behind it to document my computer game collection. One of the key differences between my projects and the many similar projects out there is that I plan to include 3D models of the game boxes.
I am creating the 3D models in Blender 3D 2.8. To get the textures, I started by taking pictures of each side of the game box and editing them into textures in Photoshop. I wanted to make it so people that didn’t have Photoshop could document their game collection and upload the models to the database.
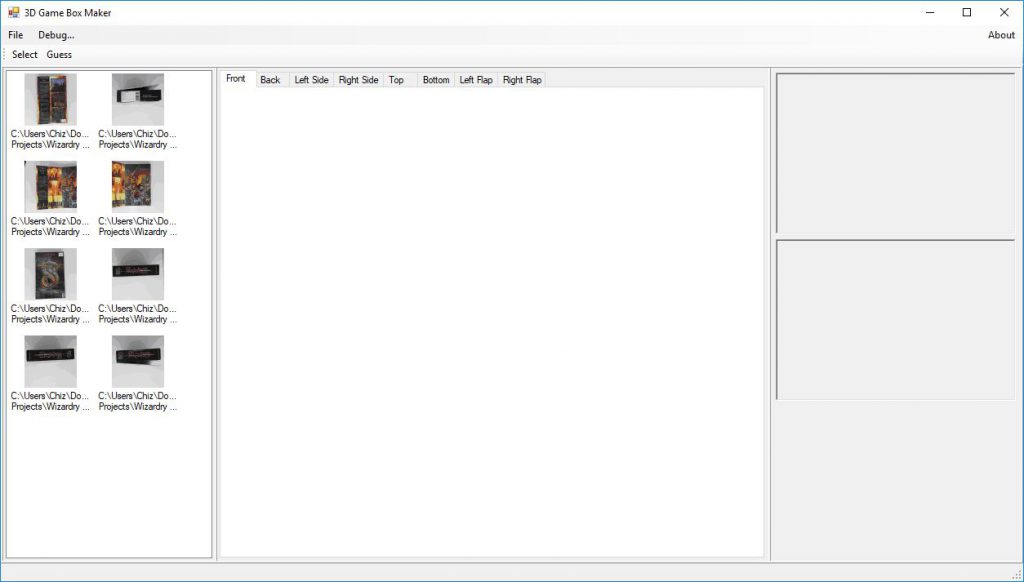
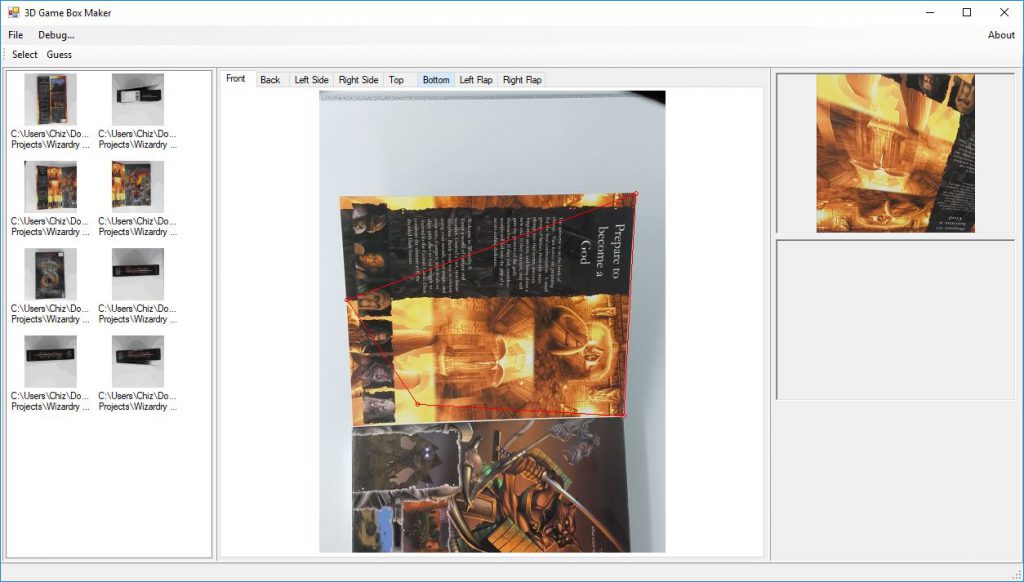
The tool is a work in progress but here is the basic idea. You load all of the photos you took of your box and they appear on the left.
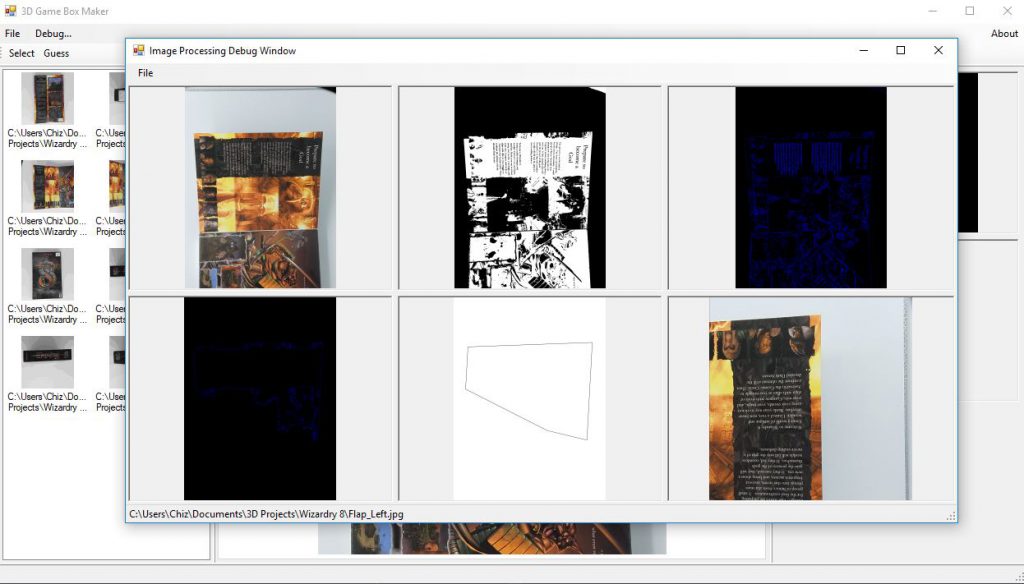
Currently the computer vision attempts to guess where the edges of the box are. It doesn’t work that great yet. That is why I have included the ability to manually edit the corners. I have included a screen shot of a case where the computer vision worked and one where it failed.
Here is what editing the failed guess looks like. As you move the corner points the preview pane on the upper right updates in real time.
I have more features planned and I also have a lot of work to do on the web site front end as well.
I wrote a calculator program in C++ in Borland’s 3.1 old MS-DOS based IDE. The interesting part for me was writing making the mouse handler class. Mouse functions weren’t included with the compiler. I had to write my own code to handle the int 33h calls to the mouse hardware. I spent enough time with it to remind myself how nice modern IDEs are.
The program is pretty simple but made a few test programs to build up to it anyway. Also these days getting something like this installed on a modern computer is quite the process. It involves virtual machines and virtual floppies.
If you want to replicate this you will first have to install some sort of virtual machine software. I have a personal copy of VMWare Workstation 12, so that’s what I used. If you don’t have that you I would recommend downloading and installing Virtualbox. It is free and will handle MS-DOS 6.22 just fine.
It is fairly easy to find copies of MS-DOS 6.22 and Borland C++3.1 floppies online. I didn’t have to do that because I still have my original disks from the early 90s. Virtually inserting floppy disks to virtual machines works just fine for this. You will have to make your own grinding noises though.
For simple programs you won’t need to do any special MS-DOS configuration. That is a relief because that can be quite tricky. Installing Borland C++ is also pretty eay to do just the defaults and reboot and you are ready to go. Unless you want a mouse then you will have to find and install a MS-DOS mouse driver.
I created a folder called “HELLO” and entered the directory by using the following commands:
md hello
cd hello
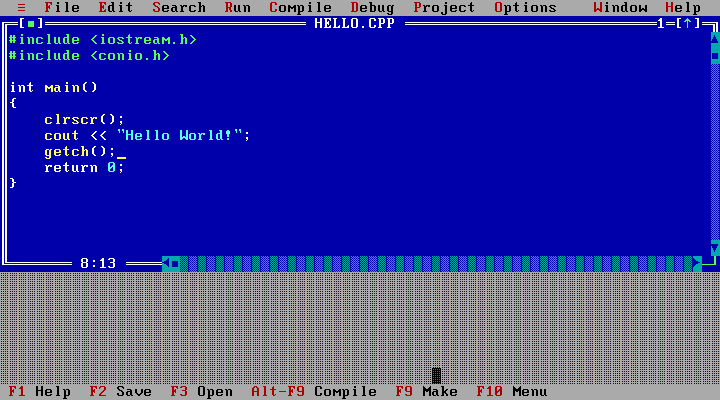
I then then launched the the Borland C++ IDE from the “C:\HELLO\” directory by typing “bc”. At first you will be able to move around the pull-down menus at the top with the arrow keys. To select something press enter. Go under “FILE” and select “New”. This will open a window that you can type into. if you want to get back up into the menus hit F10 or alt key and one of the red highlighted letters in the menus.
I typed in the following C++ code and saved it as “HELLO.CPP”
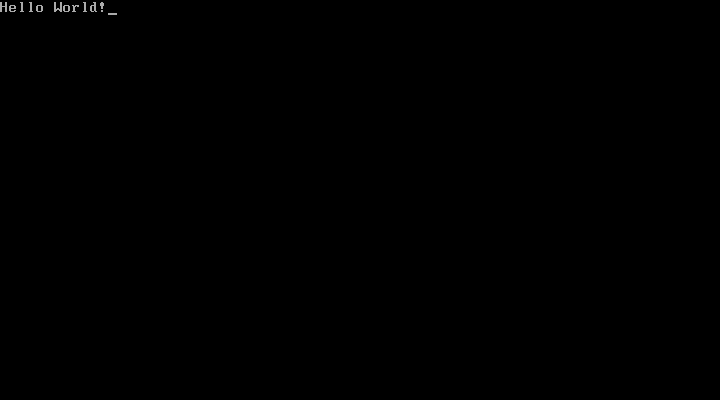
I selected “Run” from the menus and this was the glorious result.
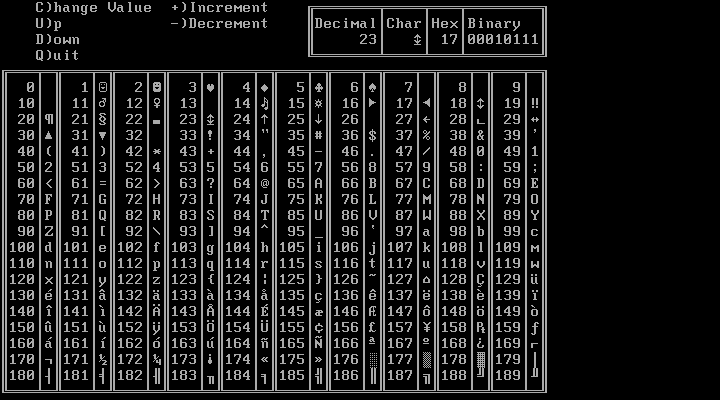
I closed HELLO.CPP and opened a new file to try something a little more ambitious. The next program will be one that displays an interactive ASCII table. This is a simple program but it highlights a some stuff that has changed in making C++ programs. I’d imagine it could stump some programmers who learned C++ recently.
//ASCIITAB.CPP
//	by CrookedFingerGuy 6/2/2011
//This is a program that displays an ascii table and information on one
//selected character value.
#include <iostream.h>
#include <iomanip.h>
#include <conio.h>

void drawMenu()
{
	gotoxy(5,1);
	cout << "C)hange Value";
	gotoxy(5,2);
	cout << "U)p";
	gotoxy(5,3);
	cout << "D)own";
	gotoxy(5,4);
	cout << "Q)uit";
	gotoxy(20,1);
	cout << "+)Increment";
	gotoxy(20,2);
	cout << "-)Decrement";
}

void drawCharInfo(unsigned char c)
{
	//draw the formatting box
	gotoxy(35,1);
	cout << "ÉÍÍÍÍÍÍÍÑÍÍÍÍÑÍÍÍÑÍÍÍÍÍÍÍÍ»";
	gotoxy(35,2);
	cout    << "º" << "Decimal"
			<< "³" << "Char"
			<< "³" << "Hex"
			<< "³" << "Binary  "
			<< "º";
	gotoxy(35,3);
	//This next section is used to change characters that
	//affect the formating and are undisplayable.
	//They are changed to the 'space' character.
	unsigned char t=c;
	if((t>=7)&&(t<=10))
		t=' ';
	else if(t==13)
		t=' ';
	else if(t==26)
		t=' ';
	else if(t==255)
		t=' ';
	//Display character values in various formats.
	cout    << "º" << setw(7) << dec << (int)c
			<< "³" << setw(4) << t
			<< "³" << hex << setw(3) << (int)c
			<< "³" << dec;
	for(int i=0;i<8;i++) //This loop outputs the binary digits
	{
		gotoxy(53,3);
		cout << setw(8-i) << (int)(c%2);
		c=c>>1;
	}
	gotoxy(61,3);
	cout << dec << "º";
	gotoxy(35,4);
	cout << "ÈÍÍÍÍÍÍÍÏÍÍÍÍÏÍÍÍÏÍÍÍÍÍÍÍͼ";
}

void drawTable(unsigned char start)
{
	unsigned char x=start;
	int row=0;
	int col=0;

	gotoxy(1,5);
	cout << "ÉÍÍÍÑÍËÍÍÍÑÍËÍÍÍÑÍËÍÍÍÑÍËÍÍÍÑÍËÍÍÍÑÍËÍÍÍÑÍËÍÍÍÑÍËÍÍÍÑÍËÍÍÍÑÍ»";
	for(row=0;row<20;row++)
	{
		gotoxy(1,row+6);
		cout << 'º';
		for(col=0;col<10;col++)
		{
			if((x>=7)&&(x<=10)) //These ifs check for undisplayable chars
				cout << setw(3) << (int)x << '³' << ' ' << 'º';
			else if(x==13)
				cout << setw(3) << (int)x << '³' << ' ' << 'º';
			else if(x==26)
				cout << setw(3) << (int)x << '³' << ' ' << 'º';
			else if(x==255)
				cout << setw(3) << (int)x << '³' << ' ' << 'º';
			else
				cout << setw(3) << (int)x << '³' << x << 'º';
			x++;
		}
	}
	gotoxy(1,25);
	cout << "ÈÍÍÍÏÍÊÍÍÍÏÍÊÍÍÍÏÍÊÍÍÍÏÍÊÍÍÍÏÍÊÍÍÍÏÍÊÍÍÍÏÍÊÍÍÍÏÍÊÍÍÍÏÍÊÍÍÍÏͼ";
}

int main()
{
	//Initialize screen
	_setcursortype(_NOCURSOR);
	clrscr();
	drawMenu();
	//Draw inital Character Info box.
	int charInfo=0;
	drawCharInfo(charInfo);
	//Draw Initial ASCII table starting at 0.
	int tableStart=0;
	drawTable(tableStart);

	//Menu Input Loop
	char choice=' ';
	while((choice!='q')&&(choice!='Q'))
	{
		choice=getch();
		switch(choice)
		{
		case '+':
			charInfo++;
			drawCharInfo(charInfo);
			break;
		case '-':
			charInfo--;
			drawCharInfo(charInfo);
			break;
		case 'c':
		case 'C':
			_setcursortype(_NORMALCURSOR);
			gotoxy(36,3);
			cout << "       ";
			gotoxy(36,3);
			cin >> charInfo;
			drawCharInfo(charInfo);
			_setcursortype(_NOCURSOR);
			break;
		case 'u':
		case 'U':
			tableStart+=10;
			drawTable(tableStart);
			break;
		case 'd':
		case 'D':
			tableStart-=10;
			drawTable(tableStart);
			break;
		};
	}
	clrscr();
	_setcursortype(_NORMALCURSOR);
	return 0;
}
This is what this program looks like when it runs. (Note: Some weird stuff may have happened above due mismatched character codes between the modern web and MS-DOS.)
This program is also slightly useful if you want to look up old ASCII codes see the characters.
Simple Tests Are Done
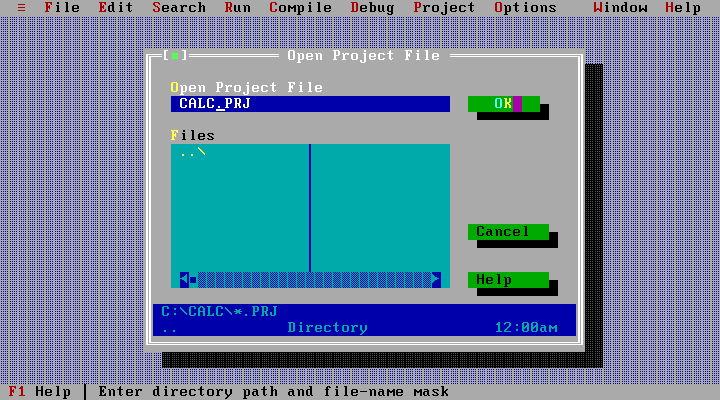
Next up is a little more advanced. Borland C++ 3.1 has projects that allow you to organize all of the various files associated with even slightly complex programs. I don’t think it is that intuitive to create a new project. There is no “New Project” menu item. You have to go to Project>Open Project.
Now you just have to know to type in your project file name in place of the asterisks.
Hitting OK lets you start adding files to a C++ project.
From here on I think the IDE is easy to learn. There are not so many menu options that you could never look through them all like on a modern IDE. You can find most of the information about compiler specific functions in the Help area. The help file is easy to search and often includes example code.
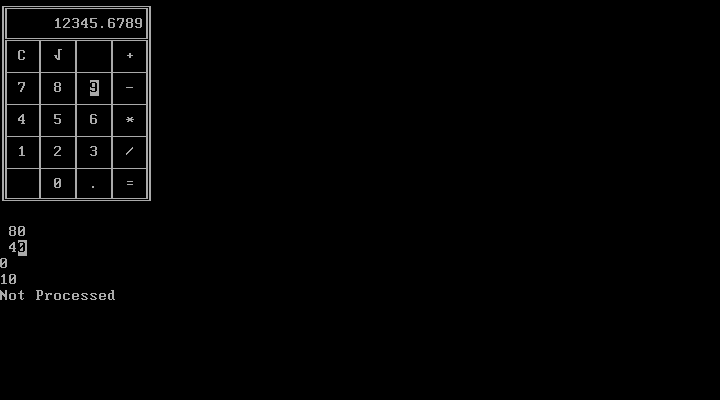
I made a program that makes interrupt calls to operate the mouse. I use them to work a simple calculator program. Here is all the code.
#include <iostream.h>
#include <iomanip.h>
#include <stdlib.h>
#include <conio.h>
#include <string.h>
#include <math.h>
#include "mouse.h"
#include "calcdisp.h"

#define MAXLEN 12 //maximum number of digits in display
#define OFFX 0 //Not used
#define OFFY 0 //Not used

//int main() is at the bottom


//This is a function for debugging/explaing the mouse stuff
void showMouseState(MouseState mTest,int clicks)
{
	gotoxy(1,15);
	cout << setw(3) << mTest.x << "\n"
		<< setw(3)  << mTest.y << "\n"
		<< mTest.button << "\n" << clicks << endl;
	if(mTest.processed)
		cout << "Processed";
	else
		cout << "Not Processed";
}


//This function takes in the mouse state and converts the
//click into the character associated with the spot on the screen
//It also increments the number of left clicks
char getMouseInput(Mouse &MyM,MouseState &m,int &clicks)
{
	int c=' ';

	//Check if the left button has been newly clicked
	//In text mode the mouse moves in increments of 8
	if((m.button==1)&&(m.processed==NOT_PROCESSED))
	{
		if((m.x>=8)&&(m.x<=24))// Left column
		{
			switch(m.y)
			{
			case 24:    //Top row
				c='c';
				break;
			case 40:    //Second row
				c='7';
				break;
			case 56:    //You guessed it third row
				c='4';
				break;
			case 72:    //There is a pattern here
				c='1';
				break;
			case 88:    //Five rows total
				break;
			}
		}
		else if((m.x>=40)&&(m.x<=56))//Second column
		{
			switch(m.y)
			{
			case 24:
				c='@';
				break;
			case 40:
				c='8';
				break;
			case 56:
				c='5';
				break;
			case 72:
				c='2';
				break;
			case 88:
				c='0';
				break;
			}
		}
		else if((m.x>=72)&&(m.x<=88))
		{
			switch(m.y)
			{
			case 24:
				c=' ';
				break;
			case 40:
				c='9';
				break;
			case 56:
				c='6';
				break;
			case 72:
				c='3';
				break;
			case 88:
				c='.';
				break;
			}
		}
		else if((m.x>=104)&&(m.x<=120))//Four columns
		{
			switch(m.y)
			{
			case 24:
				c='+';
				break;
			case 40:
				c='-';
				break;
			case 56:
				c='*';
				break;
			case 72:
				c='/';
				break;
			case 88:
				c='=';
				break;
			}
		}
		clicks++;
		MyM.setPState(PROCESSED);//Click and hold only 1 "key" press
	}
	return c;
}

int main()
{
	//Turn off the cursor and clear the screen
	_setcursortype(_NOCURSOR);
	clrscr();

	//Initialize the mouse using my custom mouse class
	Mouse MyMouse;
	MyMouse.resetDriver();
	MyMouse.visible(MOUSE_SHOW);
	MouseState ms;
	int clickCount=0;//counting left clicks is for explaination purposes only


	//Initializing the calulator display and functions
	CalcDisplay CalcD(MAXLEN);
	CalcD.showCalc();
	CalcD.showDisplay();

	//Menu Input Loop
	char choice=' ';
	while((choice!='q')&&(choice!='Q')) //press q to quit
	{
		choice=' ';
		if(!kbhit())//kbhit checks if a key has been hit
		{
			//If no key hit check the mouse
			MyMouse.update();
			ms=MyMouse.getState();

			//convert relvant mouse clicks to characters
			choice=getMouseInput(MyMouse,ms,clickCount);
		}
		else
			choice=getch(); //get the key that was hit
		//This shows the mouse state for explaination purposes
		showMouseState(ms,clickCount);

		//This is the function where the program actually adds and stuff
		CalcD.processInput(choice);
	}

	//clear the screen and turn the cursor back on
	clrscr();
	_setcursortype(_NORMALCURSOR);
	return 0;
}
#ifndef CALCDISP_H
#define CALCDISP_H

//These Enums are pretty self explainitory
//NOOP mean No Operation
//SQROOT is for the square root function
enum opType {NOOP,EQUALS,PLUS,MINUS,MULT,DIVIDE,SQROOT};


//This class contains the core of the calculator's functionality
//It also handles all of the output of the calculator
//It takes in characters that are pressed or clicked and
//works like a standard desk calculator would.
class CalcDisplay
{
public:
	CalcDisplay(int maxDisplay);
	~CalcDisplay();

	//Draws the characters that mimic a calculator keyboard
	void showCalc();

	//This handles the calculator "screen" output
	void showDisplay();

	//handles when the 'c' or clear button is pressed
	void clearDisplayBuf();

	//handles when a number or '.' button is pressed
	void addDigit(char c);

	//if there is a math operation to do this does it
	void computeAnswer();

	//Figures out what sort of button has been pressed and calls the
	//appropriate helper function to handle it
	void processInput(char c);

private:
	double displayVal; //holds what is currently showing on the "screen"
	double prevDisplayVal; //the holds the other number to do math with
	int maxDisplayLength; //Some day I might make this thing wider
	char *displayBuf; //c style string to hold what is on the "screen"
	opType curOp; //What the calculator is going to do next
};

#endif
#include <iostream.h>
#include <iomanip.h>
#include <conio.h>
#include <string.h>
#include <stdlib.h>
#include <math.h>
#include "calcdisp.h"


CalcDisplay::CalcDisplay(int maxDisplay)
{
	displayBuf=new char[maxDisplay];
	displayVal=0;
	prevDisplayVal=0;
	maxDisplayLength=maxDisplay;
	curOp=NOOP;
}

CalcDisplay::~CalcDisplay()
{
	delete displayBuf;
}

void CalcDisplay::showCalc()
{
	cout << "ÉÍÍÍÍÍÍÍÍÍÍÍÍÍÍÍ»" << endl;
	cout << "º               º" << endl;
	cout << "ÌÍÍÍÑÍÍÍÑÍÍÍÑÍÍ͹" << endl;
	cout << "º C ³ û ³   ³ + º" << endl;
	cout << "ÇÄÄÄÅÄÄÄÅÄÄÄÅÄÄĶ" << endl;
	cout << "º 7 ³ 8 ³ 9 ³ - º" << endl;
	cout << "ÇÄÄÄÅÄÄÄÅÄÄÄÅÄÄĶ" << endl;
	cout << "º 4 ³ 5 ³ 6 ³ * º" << endl;
	cout << "ÇÄÄÄÅÄÄÄÅÄÄÄÅÄÄĶ" << endl;
	cout << "º 1 ³ 2 ³ 3 ³ / º" << endl;
	cout << "ÇÄÄÄÅÄÄÄÅÄÄÄÅÄÄĶ" << endl;
	cout << "º   ³ 0 ³ . ³ = º" << endl;
	cout << "ÈÍÍÍÏÍÍÍÏÍÍÍÏÍÍͼ" << endl;
}

void CalcDisplay::showDisplay()
{
	gotoxy(2,2); //DOS conio.h function to move cursor

	if(strlen(displayBuf)>0) //is a new number being entered?
	{
		if(curOp==EQUALS)
			cout << setw(15) << displayVal;
		else
			cout << setw(15) << displayBuf;
	}
	else
		cout << setw(15) << displayVal;
}

//A number has finished being entered and an operation has been chosen
void CalcDisplay::clearDisplayBuf()
{
	prevDisplayVal=displayVal;
	displayBuf[0]=0;
}

void CalcDisplay::addDigit(char c)
{
	if((c!='.')||(!strchr(displayBuf, '.'))) //only one decimal point please
	{
		int l=strlen(displayBuf);
		if(l<maxDisplayLength-2)
		{
			displayBuf[l]=c;   //add the new digit to the buffer
			displayBuf[l+1]=0; //c style strings need a 0 at the end
			displayVal=atof(displayBuf); //convert string to float/double
			showDisplay(); //update the display with the ned digit
		}
	}
}


//This is where the calculator does the calculating
void CalcDisplay::computeAnswer()
{
	switch(curOp)
	{
	case PLUS:
		displayVal=displayVal+prevDisplayVal;
		break;
	case MINUS:
		displayVal=prevDisplayVal-displayVal;
		break;
	case MULT:
		displayVal=displayVal*prevDisplayVal;
		break;
	case DIVIDE:
		displayVal=prevDisplayVal/displayVal;
		break;
	case SQROOT:
		displayVal=sqrt(displayVal);
	};
	curOp=EQUALS;
	showDisplay();
	clearDisplayBuf();
}

void CalcDisplay::processInput(char c)
{
	switch(c)
	{
	case 'c':
		curOp=NOOP;
		clearDisplayBuf();
		displayVal=0;
		showDisplay();
		break;
	case '+':
		curOp=PLUS;
		clearDisplayBuf();
		break;
	case '-':
		curOp=MINUS;
		clearDisplayBuf();
		break;
	case '*':
		curOp=MULT;
		clearDisplayBuf();
		break;
	case '/':
		curOp=DIVIDE;
		clearDisplayBuf();
		break;
	case '@': //There isn't a square root symbol on the keyboard so...
		curOp=SQROOT;
		clearDisplayBuf();
		computeAnswer();
		break;
	case '=':
	case 13:  //The enter key will also work for equals for numpad users
		computeAnswer();
		break;
	case '.':
	case '0':
	case '1':
	case '2':
	case '3':
	case '4':
	case '5':
	case '6':
	case '7':
	case '8':
	case '9':
		addDigit(c);
		break;
	};
}
#ifndef MOUSE_H
#define MOUSE_H

//Storing the Int 33h info in readable variables
#define MOUSE_SHOW		0x0001
#define MOUSE_HIDE	   	0x0002

#define MOUSE_LEFT		0x0001
#define MOUSE_RIGHT     0x0002

#define NOT_PROCESSED	0
#define PROCESSED		1

//A structure to save usefull mouse data
struct MouseState
{
	int x;
	int y;
	int button;
	int processed;
};

class Mouse
{
public:
	//Contrstructor and destructor are not used
	Mouse();
	~Mouse();

	//Essential mouse operations
	void resetDriver();
	void visible(int vis);
	void update();
	void setPState(int p);
	MouseState getState();
private:
	MouseState mState;
};

#endif
#include <dos.h>
#include "mouse.h"

Mouse::Mouse()
{
}

Mouse::~Mouse()
{
}


//Call the function to start using the mouse driver
void Mouse::resetDriver()
{
	union REGS r;
	r.x.ax=0x0000;
	int86(0x33,&r,&r);
}

//You can turn mouse cursor visibility on and off with this
//Options MOUSE_SHOW and MOUSE_HIDE
void Mouse::visible(int vis=MOUSE_SHOW)
{
	union REGS r;
	r.x.ax=vis;
	int86(0x33,&r,&r);
}

//Makea call to Int 33h. That gets you the the coordinates and
//the button state. Next you store the data in the class's MouseState
void Mouse::update()
{
	union REGS r;
	r.x.ax=0x0003;
	int86(0x33,&r,&r);

	if((mState.button==1)&&(r.x.bx==0))
		mState.processed=NOT_PROCESSED;
	mState.x=r.x.cx;
	mState.y=r.x.dx;
	mState.button=r.x.bx;
}

//This is the function that passes mouse info to the rest of the program.
MouseState Mouse::getState()
{
	return mState;
}

//The mState.processed is used to only do something once per click.
void Mouse::setPState(int p=PROCESSED)
{
	mState.processed=p;
}
Here is what the program looks like running.
It feels like a nice little project that gave me a peek at all of the features available at the time for programmers. It was a fun little project.
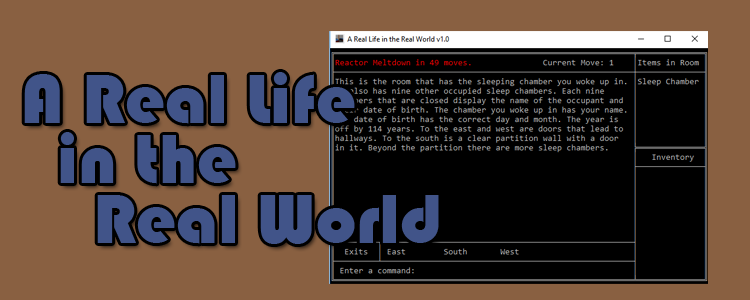
I made a text adventure game! I wrote it using C#. It uses just the console for input and output. I also wrote the all of the story in this game. It has two different endings The main ending is pretty easy to get. It takes about an hour or so to finish. You aren’t expected to complete one of the story lines in one attempt.
If you have the latest .net installed on your computer you can download and play it